Wednesday, May 22, 2013

Lelu Dallas Multipass Orange Vanilla Wheat

Lelu Dallas Multipass Orange Vanilla Wheat.

Yeah, that name is a handful.  I try to include the dominant flavor notes in a beer's name, but I also simpy gave this one a long name.

The story behind the name is kind of sad, honestly.  Once the beer was brewed, the orange and vanilla were the dominant flavors, and I tried to think of things that were orange and white colored.  I immediately thought of Milla Jovovich's character in Fifth Element - the orange hair and the white shirt.  Hence, "Lelu Dallas Multipass Orange Vanilla Wheat" was born.

Let me back up for a bit.  I've brewed an Orange Wheat each of the past two summers.  It's one of the first beers I made that was universally loved, so I try to brew a batch every year as a nice spring / summer quaffer.

I started thinking it was time for this beer when I was reading about yeast varieties one evening.

Yes, I spend my evenings reading about yeast varieties.

Don't judge me.

...

Anyway, I came across White Labs Kolsch yeast WLP029, and how it was actually recommended for American style wheat beers.  As the orange wheat has been so popular for me, I decided to make a variation on it using the Kolsch yeast.

The recipe is largely unchanged from my last attempt, although I cut the grain bill from 10.5 pounds down to 10 pounds:

4.5lb Wheat Malt
4.5lb 2-row Malt
1lb Caramel 40 (for color and sweetness)

1oz Cascade 6.8% @ 60min
1oz Centennial 9.2% @ 5 min
2oz Orange Peel (I peeled 2 naval oranges) @ 5min
1oz Cascade 6.8% Dry Hop
1 Vanilla bean dry hop


The 2oz of orange peel and the oranges I peeled it from.
You'll notice a bit of pith on the peeled orange slices.  Some people prefer to zest the orange or peel even thinner, as the pith will add some bitterness.  But with this beer, I didn't think the slight amount of bitterness it might contribute to be an issue.

I've gotten to the point now where there's not much to say about my brew days.  I have been using the same equipment for quite a while, and I tend to not even document my process anymore.  For this beer, it was mashed in at 151 and held for 60 minutes, and sparged with 170 degree water.


90 minute boil, with the Cascade added at 60 min, and the Centennial and orange peel at 5 minutes or less. 

Fermented with the Kolsch yeast in the low 60s, and it was done in about a week.  

Final Stats:
OG: 1.049
FG: 1.012
ABV: 4.9%
IBU: 29

I liked the sample from the fermenter enough that I decided to try and amp up the flavors in the keg.  I thought that the orange was pleasantly strong, but I could use a bit more citrus and some sweetness to balance the tart.  So I added 1oz of Cascade hops and 1 vanilla bean in a hop bag to the keg.  I was shooting for a balanced beer where the vanilla was a subtle complement to the orange and other citrus flavors already present.

Unfortunately, I think the single vanilla bean was too much.  I also have simply left the vanilla bean in the keg, and maybe I should have pulled that out after a week or so.


Appearance: Crystal clear with a gorgeous rich white head.  Astonishingly clear for a wheat beer, although the 2 months it has been in the keg helped with that.
Aroma: Vanilla.  So much vanilla.  And a little orange.  The cascade dry hop is completely wasted as far as aroma, but it's contributing to the thick head.
Mouthfeel: Exactly right for a wheat.  A little bit of body but very drinkable and clean.
Taste: Punch of vanilla up front.  The sweetness really lingers the whole way through.  If you search for it, there's some hop bitterness, which may be accentuated by the orange peel.  Orange is a strong flavor, but really takes a backseat to the vanilla.  You can taste the hops due to the lack of any malt sweetness, but they are completely overpowered by the vanilla.  The wheat is very much there, contributing that "wheat" flavor that's hard to define.
Overall: Too much vanilla.  It would be better without the vanilla bean as a whole, or at least with less vanilla.  It's an interesting beer - I can totally drink this, and it's great on a hot day.  But I can recognize it is fundamentally flawed.

It makes me think about beers I could use vanilla in, as opposed to a hoppy wheat.  A malty German beer would probably handle it better.  I could see a Vanilla Oktoberfest being a crowd pleaser.  But I just don't think that the vanilla works with hoppy beers.

It also makes me think about how good this beer could have been without the vanilla.  With that said - I've had several "non-beer drinkers" tell me they can drink this beer because of the vanilla.  So it has that working for it, which is nice.  Still, for my personal tastes, I'll probably make this again with a bit more cascade and no vanilla.

Wednesday, May 15, 2013

Six months of brewing and two ESBs

So, I suck.

The purpose of having this blog was so that I could document my adventures in homebrewing, including recipe details and my thoughts on batches.

Well, I've done about half a dozen batches that I haven't blogged about at all.

Hence, I suck.

Let's fix that!

Today's post is going to be about a pair of ESBs, and what I've learned about trying to brew this style.

My first attempt was back in November 2012.  I started with a grain bill very similar to my IPA:
5lb 2-Row
5lb Maris Otter
1lb Munich
8oz Crystal 60

I used mostly English hops, with a bit of Magnum for bitterness:
1oz Magnum 12.1% @ 30min
1oz Glacier 5.4% @ 30min
1oz US Hallertau 5.0% @ 30min
1oz Glacier 5.4% @ 5min
1oz US Hallertau 5.0% @ 5min
1oz Glacier 5.4% @ Dry Hop
1oz US Hallertau 5.0% @ Dry Hop

I fermented this with Safale S-05, which was a poor choice that I'll get to in a moment.

It was an uneventful brew day - hops and grain and standard stuff.  Mashed at 153, boiled for 90 minutes.  Look, hops!

The two hop additions split into half-gallon pitchers.

Everything seemed like it was on the right path.  Standard fermentation, nothing went wrong.  Kegged it after a little over a week in primary, and wound up with a beer with the following stats:
OG: 1.060
FG: 1.010
ABV: 6.6%
IBU: 66

But, it simply wasn't a good beer.  Here's why:
1. American yeast was a poor choice.  A good ESB should have fruity notes from the English yeast, and have a bready, malty flavor to balance the bitterness.  It dried out too much and was just too clean.
2. Too bitter - I never should have added the Magnum hops.  No idea what I was thinking.  The better choice would have been use an extra ounce of Hallertau or Glacier at 20 minutes - get some bitterness but also flavor.  With that said, I think those hops were part of the problem.
3. Poor hop combination.  I think the Glacier was a good choice, even though their flavor didn't come through as much as I wanted.  The Hallertau was not.  It's too "noble", in my mind, for a beer this hop forward.  I would have been better off with EKG, Fuggles, Willamette, or another English hop.  Alternatively, I could have gone very American and used a C-hop to balance the Glacier.  Either way, the Hallertau just wasn't a strong enough hop for this beer.
4. Too strong.  6.6% is too much for a supposedly easy drinking ESB.

I took this beer to the office and left it on the kegerator for six months.  Six months later, there was still 2-3 gallons remaining.  I think that says all that needs to be said - it was drinkable, but definitely not something I'd brag about.  I'm actually going to throw out the remainder.  Simply put, it's not worth bottling.

...

I wanted to try again.  I know how to make hoppy beers - that's not a problem.  But I have consistently failed to brew a solid ESB.  The one above was actually my second attempt - my first attempt's recipe has been lost to the winds of time, but it had similar issues.  Just not enough character and hoppy flavor.

Third time is the charm, right?  That was my mindset on May 1st.

Let's start by fixing the problems.
1. English yeast.  Safale S-04.  A clean, cheap, dry yeast.  $4 for a pack, guaranteed to have enough cells for a proper pitch.  Also has the benefit of putting out the fruity flavors you want in an ESB, plus will not dry it out (attenuate) as much, so it finishes a bit maltier and sweeter.
2. I cut the IBUs down to around 40.  Less bitter, less like an IPA, and more balanced with a lower amount of alcohol.
3. I went with a tried and true English hop combination.  UK East Kent Golding (EKG) and US Willamette (as a substitute for Fuggles).
4. Fix the grain bill.  Less malt, and more specialty malts to contribute color and flavor.

Here's the recipe I went with:
8lb Pilsen
1lb 6oz 2-row (because I ran out of 2-row)
12oz Caramel 80
4oz Special B

1.5oz EKG @ 60min
.5oz Willamette @ 20min
.5oz EKG @ 20min
1oz Willametter @ 1min

Safale S-04 yeast

Now, I'll admit, this is a pretty non-traditional grain bill for an English beer.  I feel that I need to explain my choices.  First, in an ideal world, I would have used entirely Maris Otter malt.  But, I was out of that, and running out of 2-row.  So, I used 8 pounds of Pilsen to give it just a bit more of a malt backbone, and just finished off my 2-row (hence the odd amount of 1lb 6oz).

Second, the Special B is a Belgian grain.  But, it had the color and flavor I was looking for.  It added a really nice copper hue and a light breadiness to the finished beer.  The Caramel 80 added a sweetness, and an almost raisin-like (very faint) flavor, as well as a bit more color.  The caramel 80 is a more standard ingredient - a true ESB is likely to use English crystal grain that's been roasted to a similar color.

Uncrushed grain.

My setup.  Burner and two pots on the left, water bucket for measurement purposes, and a 10 gallon igloo cooler as a mash tun.

The first runnings were the perfect color.


Have to love an early May brew day.  Gorgeous weather for it.

Again, a pretty standard brew day.  Mashed in for an hour at 154, sparged with 170 degree water, and collected just over 7 gallons for a 90 minute boil.

Fermentation was clean and consistent at 65 degrees, and was done within 5 days.  I left the beer on the cake for an extra five days to allow it to clean up a bit and then cold crashed.  (Cold crashing is dropping the temperature of the fermenter so that the yeast drops out of suspension and forms a compact cake at the bottom of the carboy).  That makes it easier to use my auto-siphon to rack from the fermenter to the keg without bringing any of the yeast or other particulate into the keg.

On day 11 I kegged the beer and force carbonated it at 30 PSI for 36 hours.  I brought it into the office 13 days after I brewed it, and it was a hit.  It replaced my first attempt and was immediately hit pretty hard.  It's been on draft only two days, and the five of us have already drank nearly a gallon across the two days.

Stats:
OG: 1.052
FG: 1.013 (notice the original was 1.010 - those extra 3 gravity points make quite a difference to the finished beer.)
ABV: 5.2%
IBU: 38


Appearance: Coppery.  A bit hazy, but that will likely fade with more time in the keg.  Head is firm and meringue like, but fades after a few minutes to just a wisp.
Aroma: English yeast and hops.  Simple, clean. A bit of maltiness to balance the hops. Mostly smells like ripe fruit (not citrus - very English) and flowers.
Mouthfeel: Pleasant.  I'm happy with the weight - there's enough malt there to keep it complex, while not being heavy. It might be just a bit sweet.
Taste: Yeast fruitness first, followed by a clean bitterness that finishes with a hint of bread and sweetness.  Aftertaste is hops and yeast.  I want to say there's a lot going on here, but I'm not sure that's truly accurate.  It's really 3 flavors: yeast esters, bready malt, and English hops.  Those three flavors just interplay and work so well together.
Overall: Nailed it.  Third time was definitely the charm.  At 5% I can have several pints and not hate myself the next day.  The 3 flavors are working perfectly with each other to provide the right amount of complexity.  

Potential improvements: I might want to mash just a bit lower next time.  I mashed this at 154 and it finishes just a touch sweet.  Either that or cut back on the Crystal 80 a bit more.  I'm happy with this beer, and may just focus on cleaning up the recipe a bit. I'll try this next time using 9.5 pounds of Maris Otter instead of the pilsen / 2-row combination, and cut the Crystal 80 to 8 ounces instead of 12.  The special B stays in, though.  It's a perfect addition.

In summary - ESB is one of the styles I've struggled with the most.  My first two attempts were beers I simply didn't enjoy.  But, I really feel like I've figured out what I was missing, and now I'm starting to come around to this style.  It's one I'll probably brew again next spring.  A great spring/summer beer.

Saturday, December 8, 2012

Impudent Whelp the Fifth

I've discovered over the past year that my true beer loves are IPAs and Stouts.  I spent a lot of time when I first started brewing exploring all the different styles that were available to be made, and making as many as I could.

I wound up with some surprisingly awesome beers, like my caramel cream ale, and some real clunkers, like the first ESB I attempted.

But I keep coming back to my house IPA recipe.  I blogged about my first attempt at this beer, almost exactly 1 year ago.

Since then I've made it four more times - 1/22/12, 5/11/12, 7/01/12, and most recently on 11/9/12, which is the subject of this post.  This is the only beer I've brewed more than twice in almost 5 years of making beer.

Each time I've brewed it I have tweaked a few things.  The yeast, the grain bill slightly, and the hop bill.  I've settled on a really solid base grain bill:
11lb 2-row
1lb Munich
.5lb Light Crystal (carapils, crystal 15, even tried CaraRed once)
mashed around 151, fermented around 64 using American ale yeast (Wyeast 1056 or Safale S-05)

The hops are a bit more fluid, but I've found that I really like the combination of Columbus, Centennial, and Citra.  This past batch I swapped out the bittering addition of Columbus for Magnum, and that was a poor choice.

For last month's attempt, I went with the following hops:
1oz Magnum @ 60
1oz Citra @ 15
1oz Chinook @ 15
1oz Centennial @ 15

1oz Citra @ 5
1oz Chinook @ 5
1oz Centennial @ 5
1oz Citra Dry Hop
1oz Centennial Dry Hop
1oz Chinook Dry Hop

As you might imagine, that makes for some sizable hop additions to the boil, especially using leaf hops.

For scale, the purple and red glasses are either 16 or 20 oz sized, so that's a lot of hops.

In fact, it was enough hops that the boil had a greenish tint to it:


There was quite a bit left over after the boil that had to be trashed.  I have to be careful with my used hops - hops are poisonous to dogs, and my wife's dogs have yet to meet something that they didn't want to eat.

There was even a green tint to the fermenter.
 It did eventually settle out - this is after six days of fermentation - ferment is complete, and the yeast and hop particles that were transferred in have settled out to the bottom.

I've had this beer on draft for a couple weeks now, and it's just now coming into its own.  I think it'll be even better in another couple weeks.

I added an extra 8oz of base grain, and had a longer boil this time to up the gravity slightly, and I think that was a mistake.  This beer has settled in at 7.6%, which is just a bit stronger than I want in a beer I'll be drinking frequently.  The higher alcohol meant it needed a bit more time for the alcohol burn to cool off, while also allowing the dry hop additions to permeate the whole keg with their contributions.

I don't know if I've mentioned it before, but my dry hop additions usually consist of adding the hops to a sanitized hop bag, weighed down with sanitized whiskey stones, and kept in the keg for the life of the beer.  I've had a lot of success with that approach, and have kept a solid fresh hop aroma for up to 4 months (the longest a beer has lasted on draft so far).


Appearance: standard IPA look and feel - lingering thick white head, clear enough to see through, light golden color.  The head fades a bit fast right now, but I expect it to last longer as the dry hops continue to contribute.
Aroma: hops, but not quite as extreme as I'd hoped.  The 1oz of centennial I used for the dry hop had been in the freezer for quite some time, and it wasn't quite as fresh as normal.  It was the last of that batch, and I've ordered fresh for the next round.  The Citra, as always, is pronounced.  The Chinook is a bit milder than I expected, and contributes an interesting counter-balance to the Citra.  If you've ever had Arrogant Bastard from Stone, that beer only uses Chinook.  I find it adds a piney, almost peanut butter influence to both the aroma and taste of the beer.
Mouthfeel: Just about right - in that nice balance between thick and thin.  Thick enough to balance the hops, while thin enough to drink easily.  It has a slickness to it - I think that comes from the Chinook.
Taste: This is why I love this beer.  It's just so damn drinkable.  Smooth with a firm bitterness, lots of floral and citrus, with some pine and a finishing bitterness that's a bit strong.  I'm not using Magnum again for bittering - it's harsher than the Columbus I normally use, and I'm going back to that. I also am not sure I'd combine with Chinook with the Citra again.  I think the Chinook is a bit overpowered, and maybe works best on its own or with a milder hop. Finally, the alcohol burn is also a bit strong.
Overall: Another IPA that I'm happy to have on draft.  It'll last 3-4 months, and I'll make another version of it, and I'm already excited about that.  Each time I brew this beer I refine my recipe a bit more, and I get excited about all the potential opportunities I still have with this beer.  Next time I'm going to switch the chinook out for something like Cascade or Centennial, and the Magnum back to Columbus, while bringing the ABV back under 7%.

This is the beer I'm proud to call my house beer, and I always love it.

It tastes even better when my lovely wife hand delivers a glass of it.

12-12-12 Bottling Day

It's been almost a year since I brewed up the 12-12-12 Wee Heavy.

It spent from 4/14/12 - 11/03/12 in an oak barrel, and then the month of November in my kegerator.

The original intent of this beer was for a bunch of us on the homebrewtalk forums to all brew a similar recipe, and then swap bottles of a beer one year later.  The ultimate goal was for all of us to share each others beers on 12-12-12, and then provide feedback.

I don't think the 12-12-12 date is going to be hit, as I just shipped out my bottles yesterday (12/07), and I don't know if my trading partners have shipped theirs yet.

But that's ok - if their beers are anything like mine, a 12% ABV beer with this much sweetness is not something I want to drink multiple glasses of in a night.

Anyway, when it came time to get the beer bottled to do a swap, I figured I might as well just bottle the entire keg, and free up the spot on my kegerator for something I'll want to drink a bit more frequently.


My bottling setup is pretty low tech.  I've got a machined metal piece that fits securely in my perlick taps, which I picked up on the forums as well.

This is then fitted tightly into a length of 1/4" food grade tubing, with a plastic racking cane at the other end.  You can see there's a rubber stopper on the racking cane - that's used to form a seal on the top of the bottle.  Assembling the piece and the cane together took some work - I had to actually boil the tubing to get it flexible enough to hold both pieces.  I wound up doing this because my initial attempt at this used 5/16" tubing, and the pieces would pop apart under pressure.

Basically, my process begins when I sanitize everything - bottles, caps, capper, the bottling wand, even the tap - and set up a station next to my kegerator.  I fill the bottles inside a large Tupperware container to handle any potential spills and to have a sanitary surface to work in.  I have a glass pitcher full of sanitizer that the wand sits in between rounds, as I only fill and cap 8 bottles as a time.  To fill a bottle, I have the tap shut off and I put the bottom of the racking cane in the bottom of the bottle.  I then slide the rubber stopper down the cane to create an airtight seal at the top of the bottle, and turn on the tap.  I burp the stopper up during the filling to release the pressure, but this process keeps the beer from foaming in the bottle, and reduces the amount of oxygen introduced while bottling.

All told, it takes about 10 minutes to sanitize 8 bottles, drain the sanitizer out, fill, cap, and set up for the next round.  I was able to get 33 bottles of the Wee Heavy bottled.  I probably drank about 6 bottles worth, lost at least half a dozen in evaporation while in the barrel, and lost a few more bottles during the numerous transfers this beer went through:
Fermenter -> Keg -> Oak Barrel -> Keg

This is a crazy beer.  The first few glasses I had, I wasn't sure I liked it.  It has a heavy sherry and boozy flavor from the barrel.  This is due to a combination of oxidation in the barrel, and the booze flavors it picked up from the barrel itself.

But the beer grew on me - it's unlike anything else I've ever had.  It finishes a bit sweeter than I'd like, and I don't think I'll ever want a full bottle just to myself.  But I'm glad I made it - it was one hell of an experiment, and I know a lot more about doing something like this if I ever choose to again.

I'll throw up another post in a couple weeks with a side by side tasting of mine vs. the others I traded with.

Thursday, November 8, 2012

Raven's Milk Stout

One of the great things about being an avid homebrewer is having the ingredients on hand for when you feel like a sudden brew.  At the end of October I was in just such a position - I had a whole Saturday laid out in front of me where I had no plans, and it seemed like a perfect opportunity.  I had yeast, grains, hops, everything I would need.

Unfortunately, with zero plans made, I also hadn't considered what I wanted to make.  Do I need something hoppy?  No, two of the five beers on draft were hoppy.  A wheat? No, I still had some of the Orange Wheat left.

What then?  Oh, I have some roasted barley.  Oh, and some chocolate malt.  Yeah, a stout!  Let's do a stout.

Searching for inspiration, I started poking around HomeBrewTalk.com, looking for a popular stout recipe to use as my base.

After a few minutes, I discovered Deception Cream Stout, a milk stout recipe.  Perfect!  Let's start brewing.

I run outside and get 4 gallons of water on the burner to come up to temp.  I come back inside and start examining the recipe more closely.

Hmmm... a milk stout with lactose sugar?  With the sweetness of that, I bet some flaked oats would go well in that.  So I grabbed a pound of flaked oats.  Next, I snagged my chocolate malt and started weighing it out, only to discover I only had half a pound while the recipe called for .75 pound. Ok, no problem - I had some Pale Chocolate malt, so I grabbed half a pound of that.  Then I grabbed my bag of roasted barley... only to discover I only had 3 ounces.

This was a problem I could not solve.  With the dark grains already chosen, I was committed to a dark beer.  But without the roasted barley, I couldn't make a very good stout.

Crap.

I considered my options.

I swore a bit.

...

I shut off the burner and drove to the local homebrew store.

An hour later, armed with my newly acquired roasted barley (and Wyeast 1084 Irish Ale yeast) I set about making myself a Saturday afternoon stout.

From that point on, it was a fairly standard brew day.  The cooler weather meant that the hose water was running closer to 50 degrees, which definitely helped cool the beer quickly using my immersion chiller.  Due to that, and the fact that I had the brewing setup ready to go when I got back, I was done in about 4.5 hours, which is pretty close to optimal.  As an aside, at my absolute fastest I still need:
1. 30 minutes to set up and heat the strike water
2. 60 minutes to mash the grains
3. 10 minutes to drain the mash
4. 10 minutes to add the sparge water and let it sit
5. 10 minutes to drain the sparge water
6. 30 minutes to get the wort to boiling
7. 60 minutes to boil
8. 30 minutes to cool, get into a carboy, and clean up

So, bare minimum, I'm looking at 4 hours to brew, and I was done in 4:30.  I was pretty happy with that.

From there I fermented at 62, and kegged after a week.

I've had this beer on draft since this past weekend, and it's a gorgeous creamy stout.


Aroma:  Roasty, but not overpowering.  I feel like I get a hint of oatmeal, but it could all be mental. Still a little young (I brewed this beer 11 days ago).
Appearance: Gorgeous.  Deep brown/black, pleasant tan head.  Head retention is not very good, though.
Taste: Smooth.  Not sweet, but smooth.  Rich with a lot of flavor, but not heavy.  Nice roasty flavor up front, with a pleasant and lightly sweet aftertaste.  Leaves you wanting more.
Body: Just right.  I was worried when it finished at 1.016 that it might be a bit thick, but it works well.  Thick enough to know you are drinking a stout, without being too heavy. Extremely drinkable.
Overall:  The more I drink of this beer, the more I want.  It's a solid, solid beer.  Very glad I spent the extra money on the roasted barley and the yeast.  This one is getting made again.  I keep coming back to the word "drinkable".  At 6% and smooth, it's very easy to have a couple pints. If you like dark beers, you'll like this beer.


Final Recipe (5.5 gallons):
7.0lb 2-Row Malt
1.5lb White Wheat Malt
1.0lb Caramel 60 Malt
1.0lb Flaked Oats
0.5lb Chocolate Malt
0.5lb Pale Chocolate Malt
0.5lb Roasted Barley
0.5lb Lactose Sugar (added near the end of the boil)

1.5oz Challenger Hops (60min)

Wyeast 1084 Irish Ale yeast

Brewed: 10/27/12
Kegged: 11/03/12
Tasting: 11/08/12
OG: 1.062
FG: 1.016
ABV: 6.1%
IBU: 23.1

Updates

Apologies for the delay since my last post.  I recently switched jobs, and that has taken most of my focus until very recently.  Over the past few weeks I've been able to devote some time to my beers, and here's where things stand:

1. Keezer: The keezer itself is awesome.  The only mod I've had to do is that I switched out the large fan I had in there for a smaller computer fan, so it was quieter and drew less power.

Of the five beers I initially had in my Keezer, I only have two left.  The Chocolate IPA (see below) and the Orange blossom mead aged on vanilla beans.  My IPA kicked earlier this week, my Orange Wheat got bottled off, and my Oktoberfest donated to the office.  I've recently racked the Wee Heavy out of its oak barrel and put it on draft, and I'll get a write-up on that soon.  I also brewed a milk stout last weekend that's already on draft, and I'll have a write-up on that as well.  The IPA just kicked, and I haven't replaced that yet.


2. Competition: This week is the deadline for the FOAM Cup, Tulsa's annual homebrew competition.  I entered 3 beers last year, and my Caramel Cream ale bronze medaled.  This year I've entered five beers:
a. Impudent Whelp IPA - essentially the same beer as the link, but a more recent version dry-hopped with Citra.  This has become my house beer - I love my IPA, and it's well received by the people who try it.
b. Orange Wheat - a beer I made in June for a 4th of July party, which was a pretty standard American Wheat beer but with  Cascade hops and the zest of two whole oranges at the end of the boil.  It was a crowd pleaser, which is why I entered it even though it wasn't a very complex recipe.
c. BarleyWine - I need to get a write-up done for this beer, but it's a barleywine I made last year based on this recipe, which spent 4 months in my oak barrel.  It's a crazy beer, around 13% ABV, thick and oaky and boozy.
d. Breakfast of Champions Stout - this beer has aged very well, and I'm proud of it.  It might do very well.
e. Caramel Cream Ale - this year's version of the beer that medaled last year, with a different yeast.  I'll probably make a third version of this beer sometime in the next few months, and I'll give it the writeup it deserves at that time.


3. Beers that didn't get a full write-up that I've brewed:
a) Chocolate IPA (mentioned above): I took the recipe for The Shinning and made a few tweaks - I dropped the roasted barley, but added 8oz of Caramel 120 and 8oz of Chocolate Rye to the grain bill.  On the hop side, I used Chinook and Columbus in the boil, and dry-hopped with Simcoe.  It's a weird beer.  Just... weird.  Has a nice hop flavor combination, but it's a bit heavy, and the spicyness from the Rye just doesn't quite fit.  A fun, change of pace beer, but it's not one of my best.
b) Fresh Hop - my dad grew hops in his garden this year.  We had Cascade, Columbus, and Centennial.  I am still learning when to pick them, unfortunately.  I used them as both boil and dry hops on a beer, and it did not turn out well.  I think the dry hop is where I went really wrong - I threw whole fresh hops in the beer for two weeks (a normal dry-hopping time), but I think it was way too long as the hops were still moist from the vine.  It extracted a very vegetal asparagus-like aroma and flavor, which I hate.  I've moved this beer into an oak barrel to let it age, and I'll see if I can save it.  Unfortunately the flavor and aroma just wasn't quite right, and I wonder if it's because I included hops that may not have been quite right?  I honestly don't know.


4. Upcoming brews: I expect to brew quite a bit before it gets too cold - I've brewed the last two weekends, will definitely brew this weekend, and hope to get another couple batches in by the end of the year.  I need an IPA to replace the one that kicked recently, I want to brew up an ESB, and I'd like to lager a Marzen over the winter.

I love creating these recipes, and I can't wait to see what I come up with next.  I hope someone out there finds this interesting as well.

Saturday, July 14, 2012

Keezer Build


As a frequent homebrewer, I found that I had managed to outgrow my two-tap mini fridge kegerator in the 2 years since I built it.  Since I brew 1-2 times a month, that meant that I had to have (at least) monthly bottling sessions to bottle off what was currently on top to make room for the new stuff.  This was time consuming, and frustrating for both my friends and myself.  "Hey, where'd that good beer from last month go, and what's this crazy thing you've got on tap now?!?!"

So, with that admittedly weak justification, I set off to build myself a five tap keezer (kegerator in a freezer).

Very important first step: Get the wife's permission.  Very important.  Don't forget this step.  I found that persistence pays off, but your mileage may vary :)

Having secured that, I started by measuring deep freezers to make sure I'd have enough room for six kegs.  My goal was to have 5 on draft, and room for a sixth to lager.

I found that my pin-lock kegs have a diameter of 9", so I started looking for freezers that were at least 18" deep and 27" wide.  I found one at Lowe's, a 12.9 cu ft Frigidaire that they had on sale. I didn't care how tall it was, because I knew I'd be adding a wooden collar to it.  This wooden collar sits in between the body of the freezer and the lid.  The taps themselves are drilled through the wood, so that you don't destroy the freezer (as the freezer's cooling coils are in the front wall).

What follows is the work that I wound up doing in order to wind up with the keezer you see above.

1. Take the lid off, and remove the seal.

I put a nail into the hinges on the back of the freezer to prevent them from flying open, and used a ratchet screwdriver to take the hex screws out of both the top and the bottom of the freezer hinge on the back.  Once the lid was free, I took a screwdriver and popped off all the clips that were securing the seal to the lid, and the plastic top to the lid.  You can see here that a keg sitting on the compressor shelf is just a little bit too tall for the freezer in its original condition.
The lid's plastic underside and the seal, set to the side.

2. Paint the lid with chalkboard paint.

I knew that I wasn't going to want to invest in whiteboard or chalkboard tap handles for five taps, and I really liked the look of chalkboard paint.  A quick trip to Lowes later, and I had sandpaper, priming paint, and a quart of chalkboard paint.

Part of the problem with chalkboard paint is that it requires a smooth surface, but the freezer lid had a dimpled surface.  I started by sanding it down as best as I could with a rough grit (60), which turned out to be a very time intensive process.  Unfortunately after quite a bit of sanding, I still had not reduced the dimpling entirely down.  Still, I moved forward with primer paint.

I let that sit overnight, then applied the first coat of chalkboard paint.

This is where I made my first mistake.  I used a standard paint roller, and it left a "spackle" style surface.  You all know the type - the bumpy surface on walls in a house.  As it turns out, I needed a high density foam roller, which I eventually discovered after a significant amount of searching online.  So, yet again, it was time to sand.  This time I used a finer grit (220) in an attempt to get the surface as smooth as possible.

After another day of letting the paint dry, then sanding, I took the foam roller and applied several coats to the surface, and set it aside.  I wound up using the entire quart of the chalkboard paint just on the lid, which means I may have used too much.

3. Prepare the boards for the collar.

I wanted a dark collar, approximately 8" high, and made out of 1x8 wood.  I came to these measurements by looking at how much additional space I would need to fit kegs with clearance on top of the compressor shelf, and by the assumption that I wouldn't want 2" thickness because of the additional weight it would add.

I picked up some Aspen wood and cut it into a frame shape.

Next, I took a jigsaw and cut out a 2.5" x 2.5" inch hole in the front piece so that I could mount a digital thermometer. I then stained the wood with a dark mahogany stain.  I really like the look this gave the wood.

After letting that dry for a day, I applied polyurethane to the boards to seal them.  This is where I made my second and third mistakes.  The second mistake was that I should have sanded down the boards after I stained them, as the stain raised the grain slightly.  The other mistake was that I used too much polyurethane, and I didn't notice where it ran down to the underside of the board and pooled.

To correct both of these mistakes, I took some 220 grit (fine) sandpaper and gave the whole boards a wet sand.  I also took a razor blade and sliced off the bumps where the poly had pooled.  Once that was done, I applied a final coat of polyurethane.

Once that had dried, I took a couple pieces of paper and built a guide for where the taps would go.  I wound up placing the taps in the exact vertical center, shifted slightly to the right horizontally (to make room for the thermometer), and spaced exactly 4" apart.  Once I had measured and marked my guide, I drilled pilot holes at the center location for each spot.  I followed that by using a 7/8" hole bit, using my pilot holes as guides.  One thing I found that helped was to go about halfway through from one side, then flip the board over and meet in the middle from the other side.  This prevents it from exploding the board outward when you punch all the way through.

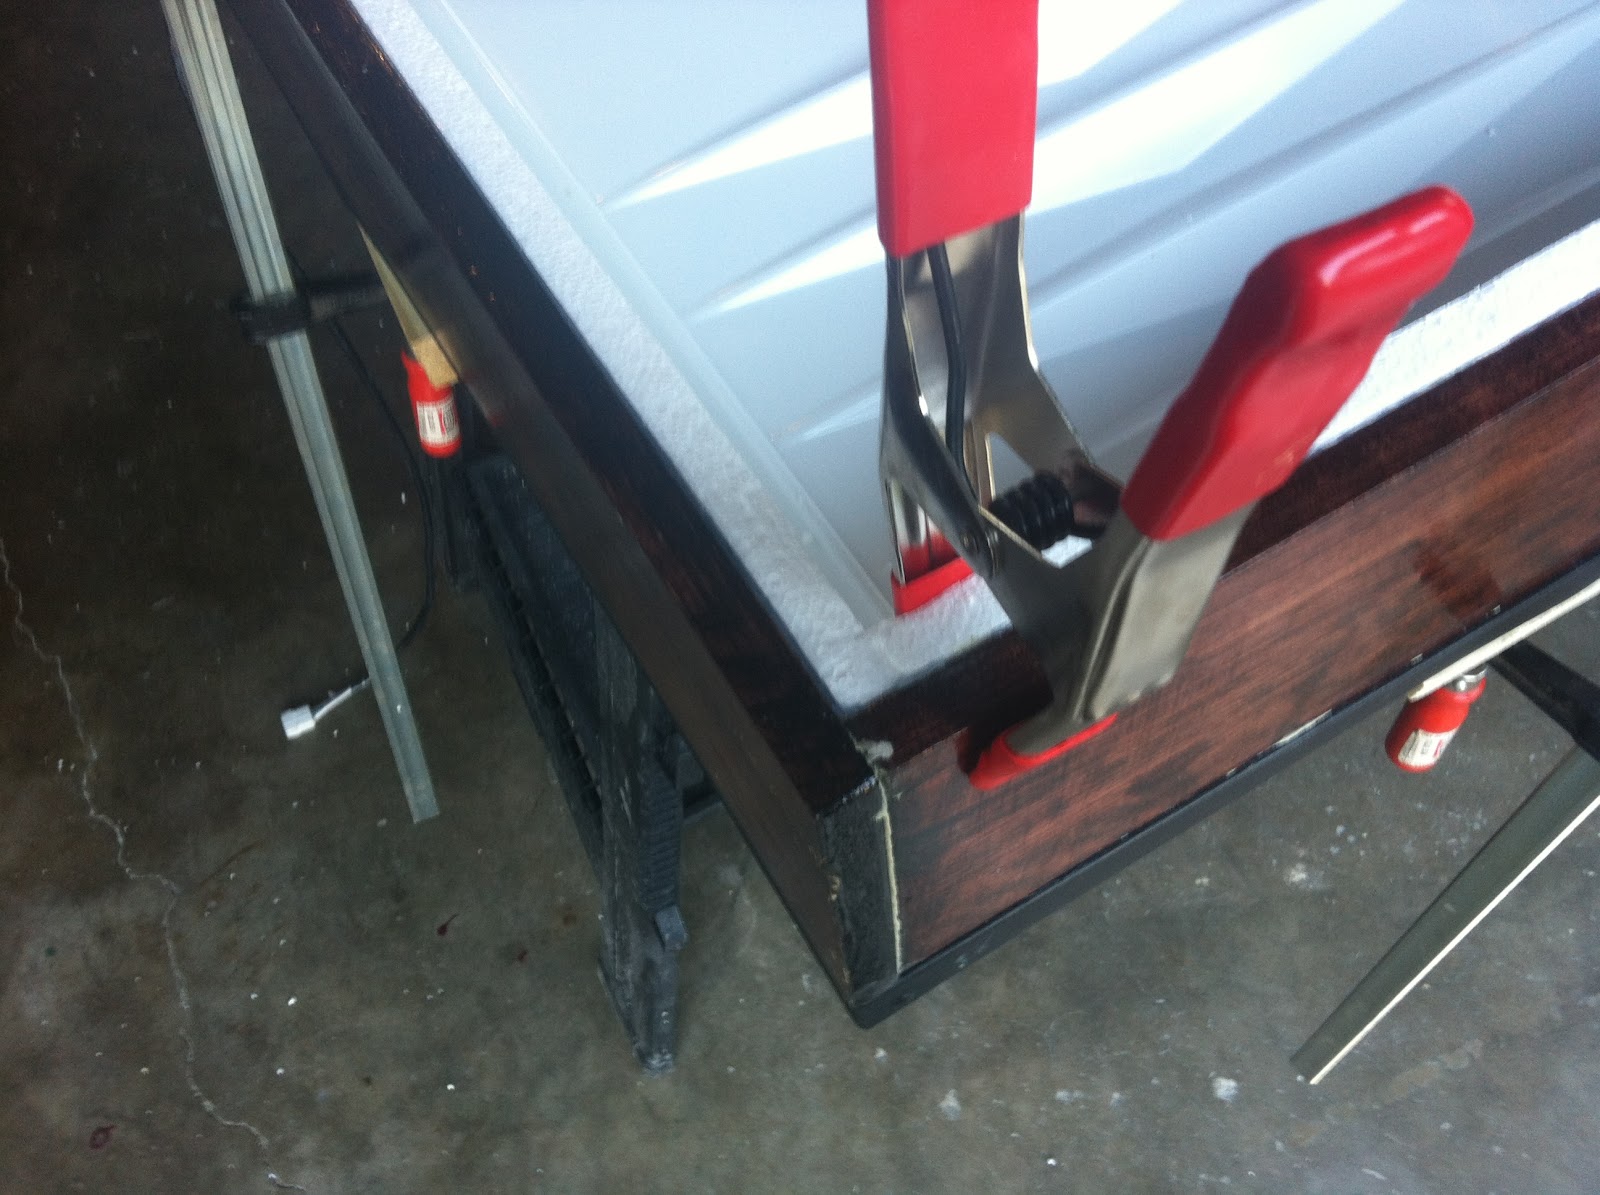
4. With my boards prepared, I need to frame them up.  I wound up using the base of the freezer itself to make sure I had the correct positioning.  I used a strong professional grade sealant to make the seals, and then clamped the boards together to cure overnight.  I also screwed in corner brackets in each corner to make sure the corners stayed square.

Once that had dried, I placed the collar on the underside of the freezer lid and repeated the process, gluing the plastic underside of the freezer lid to the top of the freezer and the freezer lid to the collar.  I made my next pair of mistakes here - I should have made sure the chalkboard paint had fully dried before I did this, and I also should have used bigger boards on the top side of the freezer as locations for the clamps.  What these two mistakes caused was a slight pinching of the two sides of the freezer lid together, and the chalkboard paint on the top stuck to the boards I used under the clamps, causing some imperfections on the paint when I popped the boards off.
From there, I bought foam insulation and cut it to fit the inside.  I secured the insulation in place on each side with the same glue, and clamped them into place.  I also mounted a small digital thermometer that measured temperature and humidity to the hole on the front, securing it with glue.  


You can also see here the hole in the back of the lid where the power for the fan and the probe for the temperature control will be run.


Once that had dried, and the freezer lid was secured to the collar, I ran a bead of silicon caulk around all of the seals.  This meant everything from where the foam met the wood to where the wood met the freezer lid.  As that was drying, I located the seal that I'd originally taken off the freezer lid and secured it to the underside of the collar I'd built, essentially turning the whole thing into a large freezer lid.

5. Affix the taps and run the lines.

I found that it was easier to run the lines with the lid off, as it kept me from working while upside down.  So I took the 5 Perlick 525 SS faucets and the 3.25" stainless steel shanks I bought from Farmhouse Brewing Supply and screwed them into location.  The 7/8" holes I had drilled allowed for a squeaky tight fit - I had to actually thread the shanks through to get them through the holes, and they secured tightly into place.

Next, I picked up 30 feet of 3/8" inner diameter vinyl tubing, and cut it into six foot sections.  I secured one end of each piece to the tailpiece of each shank, and held it into place with a 1/4" hose clamp that I tightly screwed down.  I ran each line across the top of the underside of the lid, and secured them to the back of the lid with a pair of O-rings and a velcro strap running between them.  Basically I created a velcro loop to hold them against the back, which keeps them out of the way when opening and closing the lid.  The other end of each of the lines was secured to a barbed pin-lock liquid post, and again secured with hose clamps.

On the gas side, I already had a 5 gallon CO2 tank and regulator, but I needed a six port manifold.  This was so that the one tank could keep all six kegs carbonated and at serving pressure.  Technically I only needed 5, but I decided to get the sixth port in case I ever wanted to add a sixth tap.

Again, Farmhouse came through for me with the necessary parts, and I hooked up the manifold to my regulator using the gas hose I bought from them at the same time.  Then I hooked five feet of gas line to each of the six barbed check valves and hooked the other end to barbed gas-in pin-lock posts.  As before, I secured both ends tightly with hose clamps.

Now that I had the gas and liquid lines ran, I re-attached the lid to the freezer itself.  Essentially I just flipped it over to be upright, set it on the freezer, and re-attached the hinges.  The weight of the lid was holding the seal onto the freezer body appropriately, and it all aligned flush.

6. Finish up.

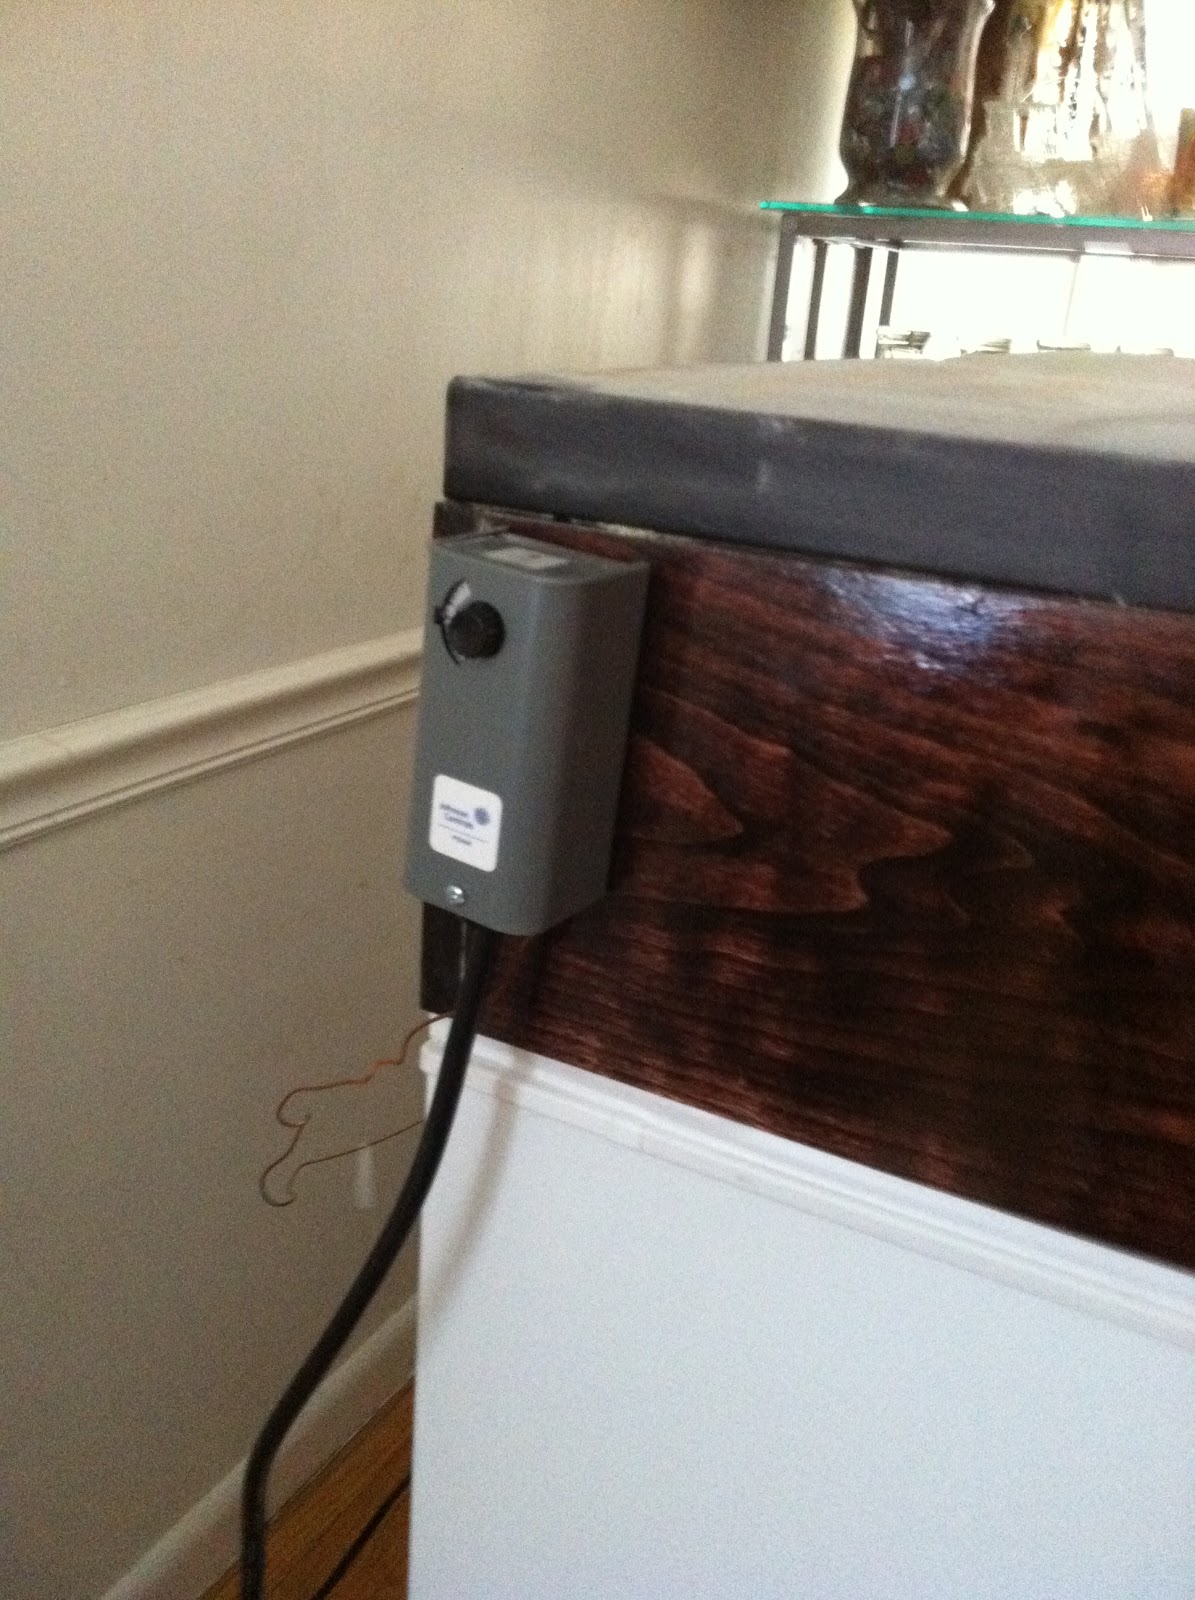
I mounted a temperature controller to the side of the collar, and ran the probe through the hole in the back.  I also ran power in through this hole to a fan, designed to keep the air flowing throughout the freezer (keep a consistent temperature between top and bottom).  I mounted the fan to the rear of the collar using a L-shaped shelving bracket, so that it was suspended out and pointed down.


I also taped the probe from the temperature controller to a bottle of water. This was so that the temperature controller wouldn't cycle as frequently.  I wanted to make sure the compressor didn't burn out, and the water bottle would allow the controller to not read temperature changes quite as quickly - thus not turn on and off as much.

Next, I took some heavy duty double-sided adhesive tape and mounted three more mounting brackets to the front of the freezer, under the taps.  Part of the reason I only spaced the taps 4" apart originally was so that the total width was 16", and would be compressed together enough that I could use my existing 19" drip tray under them.  I secured the drip tray to the shelving brackets using velcro on both side.

While this was going on, I took a keg and filled it with sanitizer.  I then ran sanitizer through each of the taps, running out anything that would have gotten into the lines.

Finally, I took a piece of chalk and "seasoned" the chalkboard paint by running the chalk across all of the paint.  I let that sit for a few minutes, then took the eraser and erased as much as I could.  This also served to give the top an even appearance, and have the chalk dust compress into some of the crevices caused by my imperfect paint job.

7.  Enjoy.

I had a keg cold from my old kegerator, so I moved it over, hooked it up, and poured myself a beer to celebrate.  I'd earned it.


Lessons learned (things I could have done better):
1. Take your time.  I tried to get everything done in one week, and I really should have given the paint and polyurethane more time to dry.  Due to my impatience, I wound up with some imperfections.
2. The right tool for the job is very important.  I wound up cutting the wood for the collar with a jigsaw, because that's all I had.  This caused very uneven cuts, and I had to spend a lot of time sanding it down.
3. Don't buy a thermometer sight unseen.  What I really should have done is gotten one with a temperature probe that was separate.  This one is all one piece, with vents on the inside that I assumed would read the internal temperature.  But, where it's mounted reads about 10 degrees too warm.  I'm guessing this is due to the ambient room temperature where it's exposed to the monitor face, even though there's no air vent on that side.
4. Give plenty of thought to where you're going to mount everything before it's too late.  The kegerator is now completed, and foam sealed all the way around, but I didn't make a spot to attach the CO2 manifold and I did a poor job of mounting the fan - it should be more centered to help with airflow.
5. Read the right way to do it BEFORE you do it.  I should have done a better job reading about staining and polyurethaning.  With that said - I was able to find a ton of tutorials online that helped me clean up my mistakes.

Even with these minor issues, I'm proud of what I built.  The wife was even impressed.  I believe her exact comment was "Wow!  It even looks professional!"  A buddy of mine came over, not knowing I'd built it, and stopped talking in mid-sentence to just stare at it.  That was a pretty cool feeling.

I spent a chunk of change on this build, but I firmly believe the enjoyment and educational value I've already gotten out of it was well worth it.  The techniques and tools I learned while making this will pay off in a number of other projects around the house.  Plus, I feel I should be able to more than recoup my investment if I ever decide to sell it.  This is by far the biggest project I've ever undertaken around the house, and it took a good 30+ hours of manual labor to see it through (not to mention the 10+ hours tracking down parts, techniques, and figuring out my design).

Worth it.